Saturday 31 August 2013

Slow cooked Carrot & Beetroot


Haiti brings the number to 108, welcome!


An earlier post of mine describes how to make my late wife's beetroot dish click here for the recipe. This is an extension to that recipe where cut up carrots are given the same treatment. When the dish is brought out of the oven, dress with 1 tablespoon of olive oil and a 1/2 tablespoon of white balsamic vinegar. Store this in the fridge and you have the makings of a great salad with the addition of cubed feta cheese and some leaves.


Notes:
I used about 750g of vegetables all together and instead of mincing or finely chopping the garlic as in the original recipe, I simply cut each clove in half.

Bruschetta 3 ways


My first encounter with bruschetta was in fact in Spain or Cataluña to be correct, in a small restaurant just north of Altafulla, where friends and I kept ordering more and more pan Catalan, which is in effect the version of bruschetta enjoyed there. The bread, good sourdough, robust and full of air holes was toasted on an open flame grill. Each slice was rubbed first with a clove of raw garlic before being rubbed with a squashed raw tomato and finally being bathed in olive oil and salt flakes. I am fortunate enough to have enjoyed meals in many fine establishments over the years, but few experiences bring back a longing as much as the evening we spent at that Catalan table.

I, these days use my bread, especially on day 3 or 4 to make bruschetta, sometimes enjoying the Catalan version, sometimes employing more of an Italian approach and adding whatever topping comes to mind. Here are 3 suggestions.

Topping 1
you will need;
500g of heritage tomatoes
1/2 teaspoon of sea salt
1/2 teaspoon of ground black pepper
1/2 teaspoon of sugar
1 teaspoon of white balsamic vinegar
2 teaspoons of olive oil
6 basil leaves

Cut up the tomatoes into smallish pieces. mix with the other ingredients and leave to marinade for half and hour

Topping 2
you will need;
300g of cooked chickpeas crushed
200g of gorgonzola or St Agur cheese
Coarsely ground black pepper

Topping 3
Roasted beetroot and carrot click here for the recipe
200g of feta cheese


Heat up a griddle and toast thick slices of good bread until each slice is browned and has the odd charred edge. Doing this on a hot barbeque produces an even better result. While each slice is hot, rub with a clove of garlic cut in half, the toasted bread will be abrasive and you'll find the clove lasts only for 4 or 5 slices, depending on the size of the clove and the vigour with which you rub. If you wish to make pan Catalan, simply rub the surface now with a squashed ripe tomato and drizzle with good olive oil and a sprinkle of sea salt flakes. Otherwise top each slice with any of the above toppings or a topping of your choice. Leave the drizzle of olive oil to the very end.


If the evening is hot, the beer or white wine is cold, there can be few things that will delight friends more than an endless supply of these simple treats.

Courgette & Cheddar Flan


My courgette plants are doing well, having realised just how much watering they require, I am managing to keep on top of it this year. I'm giving away courgettes of course to everyone who visits whilst trying to come up with new ideas for recipes. One of the issues with courgettes is the large quantity of liquid in their flesh, all that watering no doubt. Salting the grated flesh draws out almost half the weight, making the courgettes easier to use in a flan, avoiding waterlogged pastry.

For this recipe you will need.
350g of shortcrust or similar pastry,
900g of courgette
400g of mature cheddar cheese
400ml of double cream
5 medium eggs
1 teaspoon of ground black pepper
2 to 3 teaspoons of bouillon powder.
2 teaspoons of salt, to draw out the water from the courgettes

Begin by grating the courgettes. Place them in a large bowl and sprinkle with the salt. Leave the grated courgette to allow the water to leach out, this will take around half an hour. Now transfer the grated courgette into a sieve or colander and place over the bowl so that the water can now drain away. I place a plate and a heavy weight over the grated courgette to speed up the process, (a further half hour). You should end up with roughly 450g of courgette flesh, the drier the better.


While the courgette is draining, roll out the pastry and line a flan tin measuring 24cm by 5cm and bake blind in a hot oven 200C for 15 to 20 minutes, remove from the oven, remove the baking parchment and baking beans if using and dry the pastry case out for a further 10 minutes in the oven having turned down the temperature to 180C.

Mix the drained courgette with the grated cheese, eggs, cream, pepper and bouillon powder and transfer the filling to the baked pastry case, place the flan in the oven and cook for 1 hour to an hour and a quarter until the top is a rick golden brown colour and the flan feels firm to the touch. Allow to cool completely before removing from the tin.


Notes:
A tablespoon of chopped chives makes a good addition to the filling.

Monday 26 August 2013

Sodden Lemon Cake


One of the most popular recipes on my blog is the sodden orange cake ; I bought several unwaxed lemons the other day, expecting to make lots of lemonade, but somehow it just hasn't been hot enough to warrant making it. This morning needing to use up the lemons I decided a lemon version of my orange cake might work, indeed it does. The cake is very lemony, so if lemon flavour is something you enjoy I would recommend this.


I thought about what I could use in place of the cinnamon and clove in the orange version, I came up with cardamom, simply bash the pods, about a dozen of them, with any blunt instrument and add to the syrup while it simmers for 5 minutes. Strain the syrup before pouring onto the cake when it comes out of the oven, having punctured it liberally with a bamboo skewer.

To make this cake, follow the original recipe click here and substitute 4 lemons for the oranges.

Summer Soup with Pistou


When my daughter was in primary school she began what has remained a long friendship with a girl from Marseille, Camille. She was to spend every summer  school holiday in the hills above Marseille with Camille's family where amongst other delicious meals Camille's mother Denise cooked, she was introduced to soup au pistou. On the one occasion I traveled there to join her I too enjoyed this soup.
Here is my summer soup, inspired by Denise, lacking the beans because at the moment I have carrots, new potatoes, tomatoes, courgettes, petit pois and of course basil, in my kitchen. The difference I bring to this soup is to add parsley leaves and a clove of garlic to the pistou.

For this soup you will need;
1 kilo of mixed summer vegetables
2 medium size onions chopped
3 fat cloves of garlic finely chopped
2 litres of vegetable stock
1 tablespoon of olive oil
A small bunch of herbs, bay, thyme, parsley and if you have it, fresh fennel seed
100g of puntalette or other small pasta suitable for soup.

For the pistou you will need;
1 cupful of basil and parsley leaves, (4 parts basil to 1 part parsley)
1 clove of garlic
100ml of good olive oil

Begin by gently frying the onions and garlic in the olive oil until the onion is translucent and the garlic has taken on a little colour. Add the herbs tied up with a short length of kitchen twine, in order to make removing them easier later on. Meanwhile prepare the vegetables. Chop up the tomatoes and add to the pan, cook for a couple of minutes before adding the stock. Dice carrots and add to the pan as they are going to take longer to cook than other vegetables. Dice potatoes, finely shred beetroot leaves, only a few, pod the peas, runner beans would also be good and of course if you have fresh borlotti beans they would be ideal. Add the vegetables to the soup as you finish preparing them. Finally dice and add  the courgette. Let the soup simmer for 10 minutes or until all the vegetables are barely tender. Add the pasta and while that is cooking make the pistou by placing the basil, parsley and garlic in a pestle and mortar or a mini food processor and bash or blend until you have a green paste. add the olive oil and process a little more.
Serve the soup hot with a swirl of pistou in each bowl.

Notes:
As you can imagine, any number or variety of vegetables can be employed in making this sort of soup, The soup should be bulky but the intensely flavoured broth should be silky, being thickened only by the presence of the small amount of potato and pasta. 

Sunday 25 August 2013

2 Cheese Tortelloni


In Italy, the production of food is often down to a number of people, family, friends, all happily together rolling out pasta and forming age old shapes. At least this is the picture we have here in the UK where cookery programmes are always available to view on television.
I enjoy the rather solitary nature of cooking, but cooking with my daughter or friends is always a treat and never more so than when making tortelloni, where the tasks of rolling out the dough, cutting out discs, stuffing, folding and sealing the pasta can be shared. Even for novices, the skills are soon learned and there is always a deal of accompanying laughter.
The upshot is everyone enjoying the dish, is made aware of just how much longer it takes to produce a dish of hot plump pasta shapes, slipping around in an unctuous sauce, than it does to eat it. . . . . .


I have for a while now wanted to incorporate the fresh seeds of my fennel plants, growing in the flower beds and so this sauce and stuffing seemed to be a good opportunity.


For the stuffing you will need;
250g of feta cheese, crumbled
100g of parmesan cheese, finely grated
1 egg
1 teaspoon of fresh fennel seeds, chopped
a good pinch of nutmeg

For the sauce you will need;
1 medium size onion, finely chopped
3 cloves of garlic, finely chopped
4 large tomatoes, skinned, de-seeded and chopped
2 teaspoons of fresh fennel seeds, chopped
1 tablespoon of chopped fresh parsley
1 tablespoon of chopped fresh basil
2 sprigs of fresh thyme
2 tablespoons of olive oil
1 tablespoon of creme fraiche
1 tablespoon of Noilly Prat (extra dry vermouth)
1/2 teaspoon of black pepper
1/4 teaspoon of cayenne pepper


For the pasta you will need;
300g of 00 pasta flour (if you don't have any, strong bread flour can be used)
3 large eggs
1/2 teaspoon of salt

Make the pasta by mixing all the ingredients in a food processor, or food mixer fitted with a dough hook or simply by hand. The dough should be kneaded for a few minutes to form a good cohesive mass, I find a good test is to pinch a piece and it should have the same consistency as your earlobe. Set the pasta to one side, wrapped in plastic wrap while you make the stuffing.

Make the stuffing by mixing together the ingredients and forming a soft mix. I sometime use ricotta cheese but I think the use of feta works well, just remember the salt content of both the feta and parmesan is high enough to make the addition of any more salt unnecessary. Place the stuffing mix in the fridge to firm up.

Make the sauce by gently frying the onion and garlic in the olive oil on a medium heat until the garlic begins to take on a little colour and the onion becomes translucent. Add the vermouth and cook for a further minute or two, add the tomatoes and the fennel seeds along with the other herbs, reduce the heat to low, cover and cook for 10 minutes. Remove the thyme stalks, by now the leaves will have come apart from the stalks and become part of the sauce, add the creme fraiche and switch off the heat.

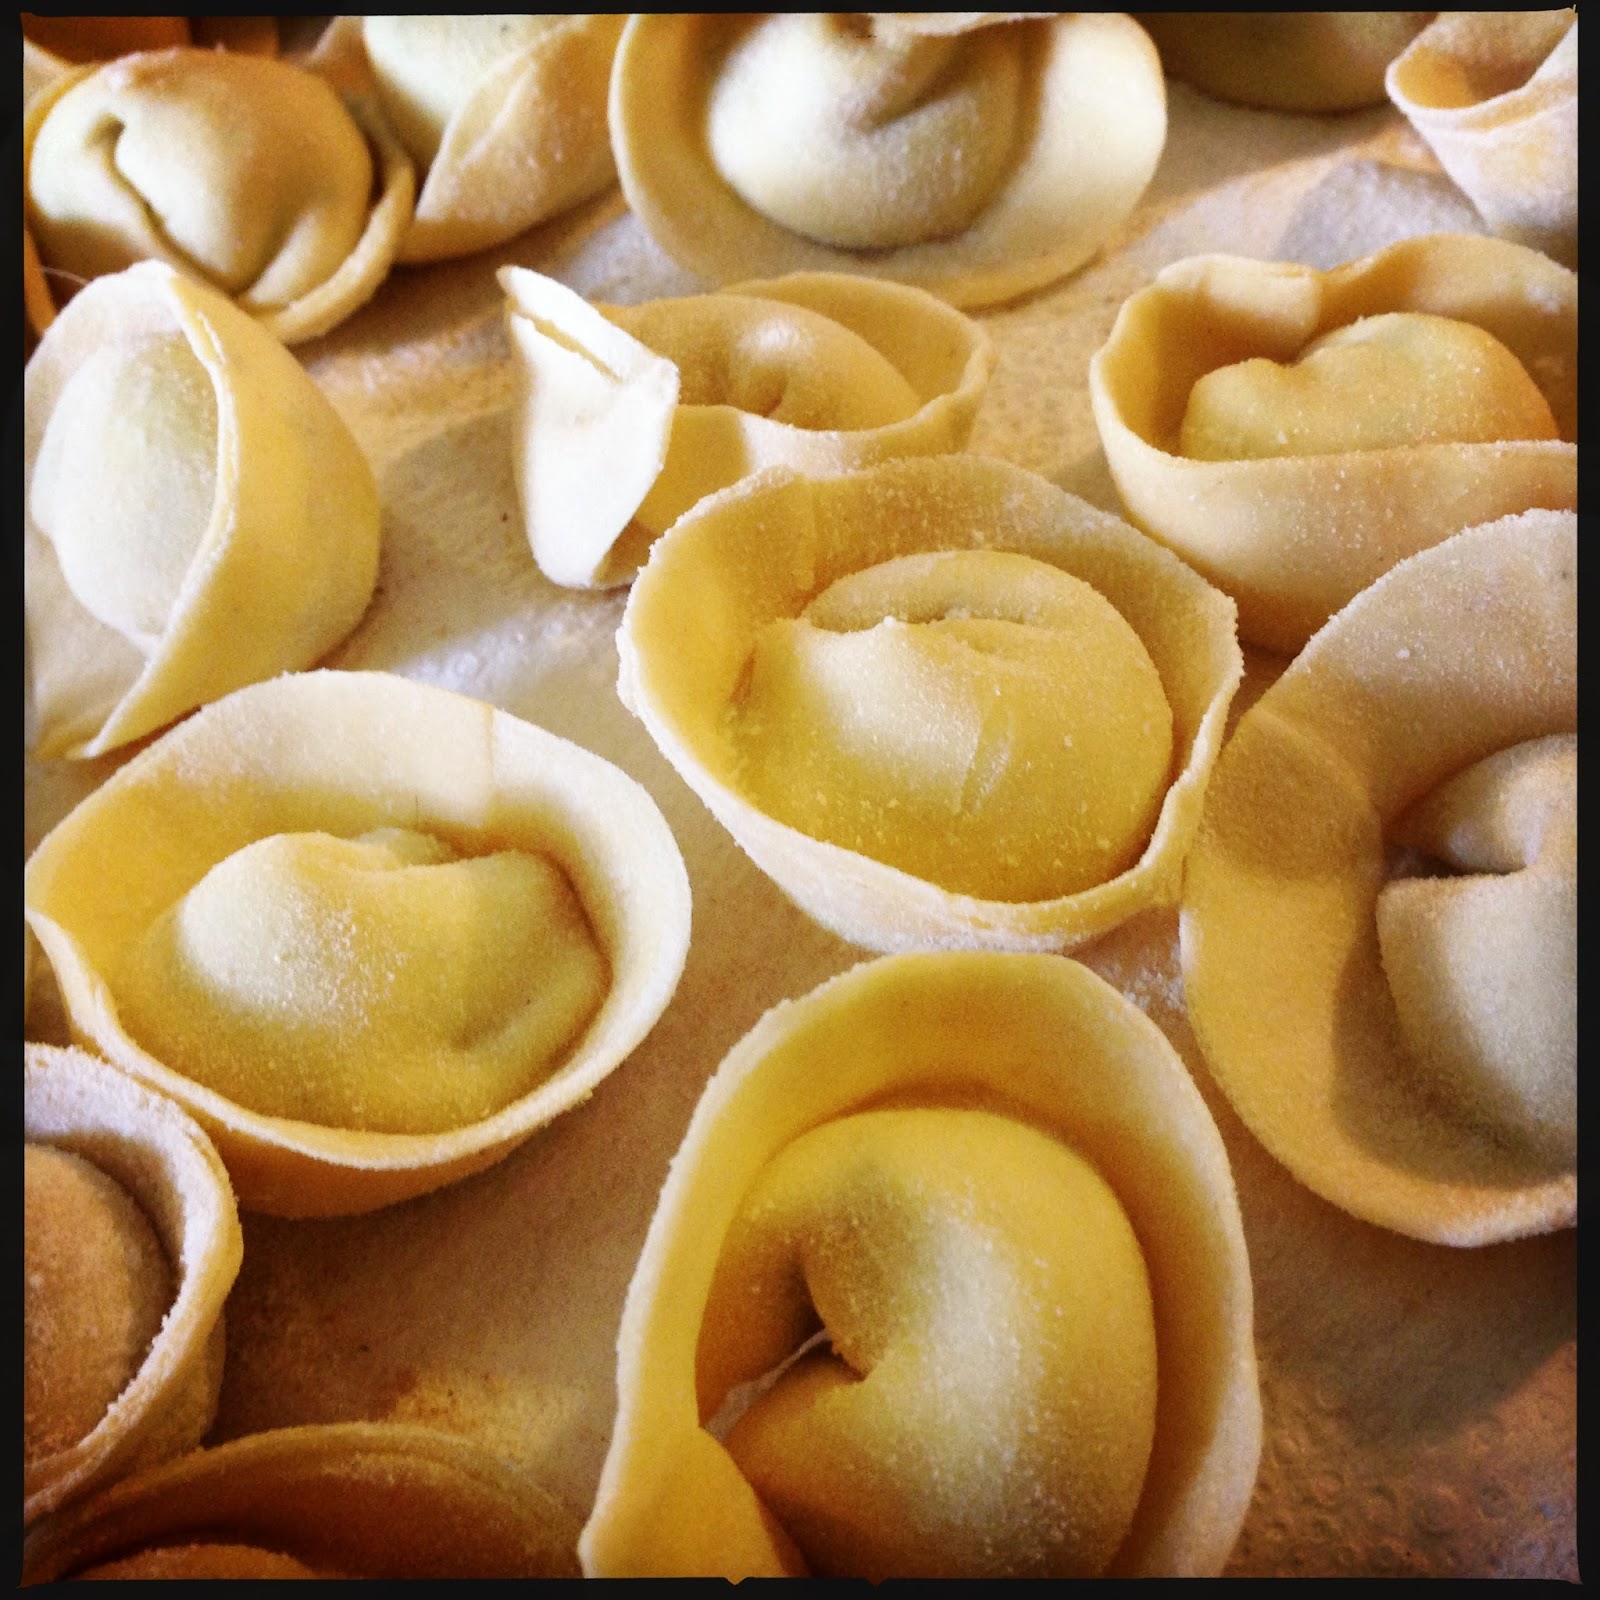
Make the tortelloni by rolling the pasta, using a pasta machine to the thinnest setting. I find if you roll the pasta (a quarter of this recipe at a time) through the thickest setting a few times, folding in between each rolling, until you hear a popping sound as the bubble trapped in the fold is burst, it makes sure the pasta is well enough worked to continue rolling on an ever decreasing setting. Roll out to the thinnest setting and on a large area dusted with fine semolina, lay the pasta down and cut out disc shapes around 8cm diameter. place a small teaspoon of the stuffing in the centre of each disc and close to form a semi-circle pasty shape. Bring both pointed ends together and pinch to form the finished shape. Set aside on a well semolina dusted tray until all are ready to be boiled for 2 minutes in vigorously boiling water.

Bring the sauce up to the boil, adding a tablespoon or two of the pasta cooking liquid to rehydrate. Drain the pasta and serve with the sauce and a scattering of freshly grated parmesan cheese.


Notes:
It is vital that the stuffing is completely sealed in the pasta, squeeze down well to bond both edges together and try to exclude as much air as possible to avoid creating air bubbles.

Saturday 24 August 2013

Wayzgoose


It's St Bartholomew's day and for people who worked in the printing industry a couple of centuries ago, this meant one thing, Wayzgoose, a feast given by the employer to mark the time when work would have to be carried out by candlelight. Presumably this practice died out many years ago, the advent of electric light alone would be enough to cause it to become history. I have always liked the name however, and despite the fact that the pie that I am making today would be a completely bizarre offering to those expectant printers, I am happy to use the excuse to come up with something to share with friends, eaten with a glass of wine and of course enjoyed in candlelight.


It would be less than helpful to give exact measurements for this pie, the whole things depends on the size of pie mould you have. I think it's sufficient in this case to describe the contents of the pie and the method I used to produce it.

I began by making a batch of pastry,

Pate Brisée

250g of plain flour
150g of butter
1 egg
1 teaspoon of salt
1 teaspoon of caster sugar
3 teaspoons of chilled water.
Begin by placing the egg, butter, salt, sugar and 1 tablespoon of the flour in a food processor and process for half a minute to form a paste. Add the remaining flour and the water and pulse until the whole comes together to form the pastry. Remove from the processor bowl, knead a couple of times to form an even mass, wrap in plastic wrap and rest in the fridge for an hour.
This recipe produces around 460g of pastry, it's a perfect amount for lining 2 of my Bakewell tart recipe.  Click here for the recipe

Meanwhile, slice up mushrooms, I used 500g, fry in a little olive oil and butter, turning to ensure even browning. The mushrooms will release water which is fine, keep cooking until all the water is driven off and the mushrooms will begin to fry again and take on a little caramelization. Many people who, like me,  grew up being able to pick mushrooms in the fields during late summer, believe that the cultivated variety of the same mushroom lacks flavour; I find cooking them long enough so that the mushrooms take on colour produces equally delicious flavour. Add a couple of small red onions, sliced and 2 cloves of garlic, chopped, along with a few strands of fresh tarragon leaves to the pan and continue cooking until the onions have become transulcent. Finally add 2 teaspoons of semolina and a tablespoon of creme fraiche and stir until mixed. Allow to cool. Slice up 150g of waxy potatoes and boil until just tender, drain and cool. Take 100g of char grilled artichokes, I use the ones that come in a jar in olive oil, drain and rinse under running water, chop roughly. When all the filling ingredients have cooled and the pastry has rested (these can easily be made a day in advance and kept in the fridge) line the pie mould with the pastry, keeping enough pastry for the lid and decoration, fill the pie in whatever way you like and cover with the lid.
Cook the pie. having glazed the top with beaten egg, in a moderate oven 180 for 45 to 55 minutes.


Sunday 11 August 2013

Julia's Roasted Vegetable Tart


Julia always comes up with cracking recipes, whenever you dine there, you can rely on something thoughtful and delicious and of course you can expect generosity. My latest experience was a tart of roasted vegetables with feta cheese, less custard than you'd expect in a quiche, and in my opinion better for it. This is my version of Julia's tart, using the vegetables that are coming out of the garden and green house these days. The addition of sumac and ground fennel seeds adds a bright note to the roasted vegetables.

Guatemala brings the count to 106! Welcome.
Country number 107, Côte d'Ivoire, welcome.


For this recipe you will need;
250g of shortcrust pastry, I use paté brisée
3 or 4 courgettes
3 small red onions
2 red or yellow peppers
1 large head of brocolli
200g of feta cheese
300ml of double cream
2 eggs
Lemon thyme, as much as you fancy
1 tablespoon of olive oil
1/2 teaspoon of sumac powder
1/2 teaspoon of fennel seeds, ground in a pestle & mortar
1/2 teaspoon of coarsely ground black pepper
Pinch of cayenne
1 teaspoon of salt flakes
1 teaspoon of Bouillon Powder

Begin by cutting up the vegetables, typically a red onion peeled and cut into quarters and the other veg cut into similar size pieces. Place in a shallow ovenproof dish, toss in the olive oil (having used a little to rub onto the peppers), salt and spices. Place the dish in a hot 200C oven for 20 to 30 minutes, removing every 5 to 7 minutes to turn the vegetables over. Prepare the peppers by rubbing with a little oil and roasting in the oven in a separate pan. After 20 minutes the skins should be a little blistered, remove from the oven cover with a cloth and allow to cool before skinning and de-seeding. Cut the prepared peppers into strips. The roasted vegetables for this tart are now ready.

Line a 25cm loose based tart tin with the pastry, rest the lined tin for 30 minutes in the fridge before baking blind. Place a piece of parchment paper on top of the pastry case, add baking beans and bake in a hot oven 200C for 14 minutes, remove the baking beans and continue baking for a further 7 minutes. Whisk the eggs, cream and bouillon powder together.

Assembling the tart; distribute the roasted vegetables in the cooled pastry tart case, crumble over medium sized pieces of feta cheese and the leaves from the sprigs of lemon thyme. Pour on the egg mix and bake the tart in a moderate 180C oven for 35 to 45 minutes, reduce the heat to 140 and cook for a further 15 to 20 minutes until the centre is cooked.


Notes:
My official tasters, Sue & Dick have given this a big thumbs up.
This tart is best served warm or at room temperature, it can be kept in the fridge for a day or two, but if so, do place it in a low 140C oven for 15 minutes to warm through before serving.
The roasted vegetables and the pastry case can also be made in advance.

Friday 9 August 2013

Gin & Tonic


There can be few drinks more quintessentially British than a gin & tonic, I'm inclined to make a long one rather than a strong one and at this time of year when I am picking three cucumbers a day from the greenhouse, the slice of lime gets replaced with long ribbons of cucumber. The gin that best suits cucumber in my opinion is Hendricks, but it's such a delicious variation on the classic that it's worth trying with any gin you have to hand

For this recipe you will need
60ml of Hendricks Gin
180ml of tonic water
2 ribbons of fresh cucmber.
4 large cubes of ice, washed.

Begin by preparing the cucumber, using a potato peeler, cut thin ribbons of cucumber along its length, I usually avoid the first ribbon of peel. place the ice cubes into a glass along with the cucumber, pour in the gin and top up with tonic water.


Thursday 8 August 2013

2 Updates


I've recently posted my recipe for shortbread and another for a moist chocolate cake; here are updates for both these recipes


The Shortbread:
I mentioned in the original recipe that I do from time to time make this shortbread adding hazelnuts. Toast 150g of raw hazelnuts in a moderate oven 140C for 15 minutes. When cool rub off as much of hazelnut skins as you can, I don't spend a lot of time doing this for this recipe, I find the small flecks of skins in the finished biscuits perfectly acceptable.
Make the shortbread click here for the recipe after adding and working in the flours, add the hazelnuts, and carefully form into a log shape. The mix is quite crumbly but with a little patience it is possible. Wrap in plastic wrap, this will enable you to roll the log more easily. Place the log in the freezer for half and hour or the fridge for 2 or 3 hours before slicing up into 1 centimeter discs, bake in the oven set to 150C for 45 to 60 minutes, until the biscuits have cooked through thoroughly and have a beige colour.

Notes:
Pistachio nuts lightly toasted in the same way make a good alternative to hazelnuts.


The Moist Chocolate Cake:
In the original recipe I baked this cake in a single layer in a 26cm cake tin, I have subsequently used the same quantity to produce a double layer cake using 2, 20cm lined tins. I think the result is lighter. Click here for the recipe

Monday 5 August 2013

Curried Salmon with Green Beans


This is really 2 dishes in one, in as much as the marinade for the salmon becomes the sauce for the green bean dish. I am teaching my friend Dick to cook a few dishes and since he has mastered fish pie, we are moving on to a dish using Indian spices.

To make this dish you will need,
For the salmon,
4 fillets of salmon
For the marinade,
400g of plain yogurt
1 tablespoon of honey
The juice and zest of 2 limes
6 cloves of garlic minced
A good thumb sized piece of fresh root ginger minced
2 teaspoon of wholegrain mustard
1 chopped chilli
1 teaspoon of cayenne pepper
1 teaspoon of salt
1 teaspoon of turmeric powder

For the green beans,
All the marinade from the salmon
500g of green beans
1 tin of coconut milk
2 tablespoons of vegetable oil
1 teaspoon of black mustard seeds
1 teaspoon of cumin seeds
Chopped coriander

Begin by marinading the salmon fillet, in a large bowl mix up all the marinade ingredients and place the salmon so that each fillet is covered in the marinade for half an hour. Carefully remove the fillets and place in an ovenproof dish that can fit under a grill. Make sure the fillets are nicely coated with the marinade at this point, you can always spoon a little over them but the bulk of the marinade is needed now for the bean dish.

Blanch the trimmed green beans by bringing water up to a boil and boiling the beans for 4 minutes, drain and refresh them in cold water.
In a large pan heat up the oil, add the mustard and cumin seeds and fry until the seeds begin to pop. Add the marinade to the pan along with the tin of coconut milk. Cook for a few minutes before adding the beans and peas (if using)
Place the salmon under a hot grill for 4 to 5 minutes, the salmon should not require turning and should take on a little charring on prominent edges. Be careful not to overcook the salmon, fortunately with the honey in the marinade, will mean the edges brown quite quickly and as long as you keep an eye on them, the fillets will cook beautifully and brown sufficiently before overcooking dries them out.
As soon as the salmon is under the grill the green beans can be warmed through in the sauce, simply heat through on a low to medium heat with a lid on the pan.
Serve these two dishes with rice, scatter on a few sprigs of fresh coriander leaf and stalk before serving.


Notes:
If you are making these dishes along with other Indian influenced dishes and you have vegetarian diners sharing it with you, it's important to point out the sauce for the beans has been in contact with salmon.
You will see from the photo I occasionally add a few fresh or frozen peas to the beans to stretch the dish a little when you discover more people are dropping in for dinner.


Dosa


I'm sure many of you have been in a restaurant where you have seen a waiter or waitress serving a dish to a fellow diner and immediately scoured the menu to find what it might be. This is exactly what happened for me in Diwana's decades ago when I first saw a paper dosa being carried from the kitchen to a diner in another part of the restaurant. "I want one of those whatever it is" I said and with a little investigation I located it amongst the other items on the menu and from that day on I have been totally smitten. I find it hard, almost impossible to dine in a restaurant serving South Indian food, to not order one. Who knows all the other delights I am likely to be missing out on.

I struggled for years to find a way to cook these thin, crisp delicacies. Making up the batter is straightforward and simple enough, it's the question of how to cook them. A hint many years ago about how to make my thick flat skillet even more non stick helped considerably. When the skillet is hot, simply take half a small potato, dip it in a little oil and rub the cut side on the hot surface. The combination of starch from the potato and the oil render the surface of the iron really non stick.

I will never be able to impress with the giant forms of these dosas, which when curled into an huge funnel shape and carried through a dining room, catch unaware diners like me, but I can now cook smaller ones and enjoy the delicious savoury flavour whenever I want.

For this recipe you will need;
1 cup of white rice
1 cup of urid dahl
1 teaspoon of fenugreek seeds
1 teaspoon of salt
Vegetable oil

Begin by soaking the rice and the dahl, separately, in 2 bowls. I add the fenugreek seeds to the rice. Leave overnight. Place the dahl in the blender and blend until you have a smooth paste, add a little more water if you need to. Pour the mix out and repeat with the soaked rice and fenugreek seeds. This will take twice as long to blend which is why you soak them separately. Blend to a smooth paste adding more water if you need to. Add the blended rice/fenugreek seed mix to the dahl mix and whisk in the salt and enough water to produce a single cream consistency. Leave the mix covered in a warm place for the whole day. If you are not going to cook the dosa in the evening for dinner, keep the mix in a container in the fridge for up to 3 days.

Cook the dosas by heating up either a heavy flat iron griddle or a very heavy based pan on a low heat for at least 10 minutes so the griddle heats up evenly and doesn't have hot spots. Taking half a potato and dip the cut end in some oil and rub the surface. Pour a ladle full of the batter onto the middle of the griddle and gradually spread the mix out to form an disc of even thickness. I find it easiest to have the mix thin enough so that the disc forms itself rather than having me do much spreading. When the surface appears to have dried out, dribble on a little (no more than a teaspoon) of vegetable oil over the surface and continue to cook until the edge begins to curl up. carefully slide a large pallet knife under the wafer thin disc and turn it over. Continue to cook for a further minute before taking it off and serving.


Notes:
I find making dosa requires the cook to be pretty much on constant cook fatigues until enough of the diners are eating and there is one for the cook. From then on simply pour more batter onto the griddle and leave to cook, they usually take 4 to 5 minutes each. Its' possible to cook several of them before sitting down to dinner, stack them with a sheet of greaseproof paper in between and flash each one onto the griddle for no more than a minute to re-crisp them.

Shortbread


Shortbread is a reliable biscuit to make and it stores well for when folk drop in for a cuppa. Easy to make and few ingredients, here is my mother's recipe which I have seen no need to deviate from.

For one disc which will cut into 8 decent portions, you will need;
165g of butter (see note)
80g of caster sugar
180g of plain flour
80g of rice flour

Begin by mixing the butter and sugar in a food mixer until you have a smooth and even paste, add the flours and continue to mix until you have a soft dough. Spill out onto a floured surface and shape into a disc, transfer to an 20cm loose bottomed cake tin and press to flatten, Dock by making holes in the disc with a wooden skewer. Leave to rest while the oven heats up to 140 to 150C, bake for 45 to 60 minutes. I like to bake the shortbread at a lower temperature than sometimes suggested and for a little longer to achieve a very pale but well dried out finish. Take the cake tin out of the oven and divide into triangles while still hot. Leave to cool completely before removing from the tin.


Notes;
I suggest 140C to 150C because ovens vary and if like me, you wish the shortbread to be pale, keep an eye on the temperature and turn it down if the shortbread looks as though it's browning.
This is one of the few recipes where I use salted butter, but if you have only unsalted, add 1/2 a teaspoon of salt for this quanitity.
Having said that I see no reason to change the recipe, I do occasionally add lightly toasted whole hazelnuts, I then roll the dough up into a log shape, chill in the fridge for a couple of hours or so before cutting into 1cm individual biscuits and baking as above.